I'm not going to lie, I have been pretty disappointed with most of the Android tablets that have come to the market so far.
The most important factor to me, and too a lot of other people I am sure, has been the price point, and Android tablets have been too expensive for me to consider buying.
But perhaps it will in the very near future.
Rumors are flying around that Amazon will finally release their own Android powered tablet on Wednesday, and that it could be priced as low as $250!
See this article below about how even Apple might be scared about the Amazon tablet.
http://www.foxnews.com/scitech/2011/09/26/amazons-wednesday-tablet-launch-threat-to-apples-ipad-analysts-say/

Monday, September 26, 2011
Tuesday, August 23, 2011
Android ActivityNotFoundException
This article briefly describes how you can solve an Android ActivityNotFoundException.
One type of error that you may encounter while programming in Android is the "activity not found" exception. This error can be particularly perplexing at first, because as you look through your source files you will see no compilation errors.
The solution is to modify the manifest for the Android application. The manifest includes all sorts of information about the application, included a list of defined activities that run in the application.
Update the manifest to include information about the activity that it couldn't find, and run your program again. You should not experience this error anymore.
Listed below is an example of a line of code you can add to your manifest to declare an activity.
One type of error that you may encounter while programming in Android is the "activity not found" exception. This error can be particularly perplexing at first, because as you look through your source files you will see no compilation errors.
 |
| Screenshot of the logcat output showing an ActivityNotFound exception |
The solution is to modify the manifest for the Android application. The manifest includes all sorts of information about the application, included a list of defined activities that run in the application.
Update the manifest to include information about the activity that it couldn't find, and run your program again. You should not experience this error anymore.
Listed below is an example of a line of code you can add to your manifest to declare an activity.
<activity android:name="CatalogActivity"></activity>
Monday, August 8, 2011
Source Code Available from Github
The source code for the shopping cart tutorial part one is now available for download through github.
Pasted below is a link. Enjoy, and look for more projects to appear on Github in the near future.
https://github.com/dreamdom/Shopping-Cart-Part-1
Pasted below is a link. Enjoy, and look for more projects to appear on Github in the near future.
https://github.com/dreamdom/Shopping-Cart-Part-1
Thursday, July 7, 2011
Making a Full Screen Android App
This article demonstrates how to make an Android app that uses the full screen.
When you are dealing with portable devices you are usually dealing with limited screen real estate. This means that you have less room to display information to the user, and if your app chooses not to hide the title bar and notification bar you are left with even less space.
Personally, I think the title bar is kind of plain looking and generally not necessary. Usually you know what app you are currently using, and there isn't much space to make the title bar display anything interesting.
Why Make an App Fullscreen?
When you are dealing with portable devices you are usually dealing with limited screen real estate. This means that you have less room to display information to the user, and if your app chooses not to hide the title bar and notification bar you are left with even less space.
Personally, I think the title bar is kind of plain looking and generally not necessary. Usually you know what app you are currently using, and there isn't much space to make the title bar display anything interesting.
 |
| Screenshot of an Android App with Title Bar and Notification Bar |
Tuesday, July 5, 2011
Change Anroid Emulator Soft Keyboard
This is a short tutorial that explains how you can change the Android Emulator soft keyboard to display in English.
At least twice when I have created Android Emulators, the system is set to display in English, but the soft keyboard that shows up contains Japanese characters. This can be a problem if you need to test specific inputs and don't know Japanese (sadly, I don't).
Have no, fear. This is a simple problem to fix.
And you would like it to display an English based soft keyboard, then...
For Some Reason...
At least twice when I have created Android Emulators, the system is set to display in English, but the soft keyboard that shows up contains Japanese characters. This can be a problem if you need to test specific inputs and don't know Japanese (sadly, I don't).
Have no, fear. This is a simple problem to fix.
If your Android Emulator Keyboard Looks Like This...
 |
| Emulator with Japanese soft keyboard |
And you would like it to display an English based soft keyboard, then...
Android What Does DIP Stand For?
This article introduces the concept of DIPs for Android.
DIP stands for Density Independent Pixels. Density Independent Pixels are also abbreviated as DP.
One Density Independent Pixel is defined as one pixel on a 160 DPI (dots per inch) screen.
What Does DIP Stand For?
DIP stands for Density Independent Pixels. Density Independent Pixels are also abbreviated as DP.
One Density Independent Pixel is defined as one pixel on a 160 DPI (dots per inch) screen.
Sunday, July 3, 2011
Starting Another Android Activity With Intents
This tutorial will demonstrate how to start a second activity with Android and how to debug an Android ActivityNotFoundException.
Most Android projects involve using multiple activities. This tutorial will demonstrate how you can create start a second activity from your application, and pass along extras as well.
First, we will create two different layouts, main.xml and secondactivity.xml
Using Multiple Activities
Most Android projects involve using multiple activities. This tutorial will demonstrate how you can create start a second activity from your application, and pass along extras as well.
Create Two Layouts
First, we will create two different layouts, main.xml and secondactivity.xml
 |
| Screenshot of the main.xml layout |
Friday, July 1, 2011
Back in Business (Kind Of) with MotoDev Studio
More Computer Woes
Unfortunately my main Android Development computer decided that it didn't want to turn on anymore. I think it is still a problem that can be fixed, perhaps by changing the power supply, but I figured it was time to move on and set up my laptop for Android Development.
As I was about to start downloading all the necessary components, I saw something called MotodevStudio which was a Motorola product. It is based off the Eclipse platform and makes the claim that it makes it easier to develop Android applications. I thought I would give it a try.
 |
| Setting up MotoDev Studio |
Wednesday, June 22, 2011
Computer Trouble
Unfortunately it looks like my computer where I do all my Android development has died. It was a Gateway desktop. I haven't had time to see if it is anything I can fix yet.
I have a laptop that I use as well, but I will need to set it up for proper Android development. It may be a little while longer before I get any big tutorials up.
But I am still planning on keeping up the pace of publishing more tutorials to the blog, once I get going again. Feel free to make any requests in the comments and I will try to get to them.
Monday, June 20, 2011
Hi everybody!
We have good news for you.
You can now contact us
via email: theandroiddom@gmail.com
via Twitter: @AndroidDom
Talk to us, we would love to hear from you.
We are also working hard to bring you an improved Android Dom experience.
So, pardon the dust while we make some changes around here.
We have good news for you.
You can now contact us
via email: theandroiddom@gmail.com
via Twitter: @AndroidDom
Talk to us, we would love to hear from you.
We are also working hard to bring you an improved Android Dom experience.
So, pardon the dust while we make some changes around here.
Friday, June 17, 2011
Displaying an Android Toast
This tutorial describes how to display a toast in an Android Application.
A toast is a small message that pops up at the bottom of the user's Android device. Shown below is a screenshot of a toast. Toasts differ from message boxes in the fact that they don't take focus, so they are less intrusive.
What is a Toast?
A toast is a small message that pops up at the bottom of the user's Android device. Shown below is a screenshot of a toast. Toasts differ from message boxes in the fact that they don't take focus, so they are less intrusive.
 |
| Screenshot of an app displaying a toast. |
Wednesday, June 15, 2011
Android Shopping Cart Tutorial Part 2
This tutorial picks up where the first Android Shopping Cart Tutorial leaves off. In this part we will modify the shopping cart to be able to handle multiple quantities of products.
The source code is now available on github.
Update - after following this tutorial, be sure to check out part 3.
Before We Begin...
Code often goes through many iterations. And we will do that with the existing shopping cart code from the first Android Shopping Cart Tutorial. In this tutorial we will update the code to handle quantities of products. We will also update the code to be even more object oriented which should make it easier to add more features in the future.
 |
| Screenshot of the ShoppingCartActivity displaying quantities |
Tuesday, June 14, 2011
Displaying an Android Pop Up Dialog (AlertDialog) Part Two
In this tutorial we revisit Android Alert Dialogs use as pop up windows and dive into some more advanced features. These include setting positive,negative, and neutral buttons, adding a text view, and setting a completely custom layout.
In this tutorial we will demonstrate some more advanced features of the Pop Up dialog. These advanced features can be useful, but it is important to reiterate a word of caution. Pop up windows can be annoying.
It can be tempting to throw in a couple of settings in a pop up window, which can be fine, but plan ahead if you want to add more settings in the future. Pop up windows are smaller than a full activity, and can be difficult to deal with if they are presenting too much information.
We are going to build off the code that we created in the first part of the tutorial, Displaying an Android Pop Up Dialog (AlertDialog).
Intro
In this tutorial we will demonstrate some more advanced features of the Pop Up dialog. These advanced features can be useful, but it is important to reiterate a word of caution. Pop up windows can be annoying.
It can be tempting to throw in a couple of settings in a pop up window, which can be fine, but plan ahead if you want to add more settings in the future. Pop up windows are smaller than a full activity, and can be difficult to deal with if they are presenting too much information.
We are going to build off the code that we created in the first part of the tutorial, Displaying an Android Pop Up Dialog (AlertDialog).
 |
| Screenshot showing the positive, negative, and neutral buttons. |
Saturday, June 11, 2011
Displaying an Android Pop Up Dialog (AlertDialog)
This article will demonstrate how to display a pop up dialog (AlertDialog) in Android. Be sure to check out part 2 when you are done.
Sometimes you want to be able to quickly display a small amount of information to the user. Pop up dialogs are perfect for doing this. The user can see and interact with a small message, without being driven too far away from the main activity.
However, make sure you don't go overboard with your use of pop up dialogs. If you are trying to display a lot of information they can be ugly looking, and users could become annoyed if too many of them start showing up.
Why Use a Pop Up Dialog
Sometimes you want to be able to quickly display a small amount of information to the user. Pop up dialogs are perfect for doing this. The user can see and interact with a small message, without being driven too far away from the main activity.
However, make sure you don't go overboard with your use of pop up dialogs. If you are trying to display a lot of information they can be ugly looking, and users could become annoyed if too many of them start showing up.
 |
| Screenshot of the app showing a pop up dialog |
Wednesday, June 8, 2011
Adding Local Images to An Android Webview
This tutorial demonstrates how to download a web page from the internet, and then modify that web page to use local graphics resources before displaying to the user.
Perhaps you want your app to dynamically load data from the internet, but you frequently want to display the same images. Using local images can be a good way to cut down on the amount of bandwidth needed for an application and could improve performance.
If you haven't all ready, please take a look at the previous tutorial, displaying a static web page in android.This tutorial will be building off of that.
Why Use Local Images?
Perhaps you want your app to dynamically load data from the internet, but you frequently want to display the same images. Using local images can be a good way to cut down on the amount of bandwidth needed for an application and could improve performance.
Before We Start
If you haven't all ready, please take a look at the previous tutorial, displaying a static web page in android.This tutorial will be building off of that.
Sunday, June 5, 2011
Android and SQLite
This tutorial demonstrates how you can use SQLite in your Android application to build a list of high scores.
SQLite can be a powerful tool that makes it easy to store, access, and manipulate data.
Say that you have designed a game for Android, and you would like to keep track of the user's high scores for the game. You could store the high scores in an SQLite database, and retrieve the scores sorted from highest to lowest to display to the user.
I should also note that some basic understanding of SQL would be helpful when reading this tutorial.
We are going to build a simple app that will allow us to test using SQLite to store and retrieve our list of high scores. Our app must allow us to easily add new scores and easily retrieve the list of high scores.
The Layout
Our app will include an text input and a corresponding button to add a new high score, and a webview to display the highscores. The webview will refresh whenever a new highscore has been added.
The first text input will contain the name of the player for the high score. The second text input will contain the score.
Why Use SQLite in your Android App?
SQLite can be a powerful tool that makes it easy to store, access, and manipulate data.
Say that you have designed a game for Android, and you would like to keep track of the user's high scores for the game. You could store the high scores in an SQLite database, and retrieve the scores sorted from highest to lowest to display to the user.
I should also note that some basic understanding of SQL would be helpful when reading this tutorial.
Building a Simple App
We are going to build a simple app that will allow us to test using SQLite to store and retrieve our list of high scores. Our app must allow us to easily add new scores and easily retrieve the list of high scores.
The Layout
Our app will include an text input and a corresponding button to add a new high score, and a webview to display the highscores. The webview will refresh whenever a new highscore has been added.
 |
| Screenshot of the layout |
The first text input will contain the name of the player for the high score. The second text input will contain the score.
Android Tic Tac Toe Game Logic - Part 1 Interfaces
This post describes the game logic behind making an Android version of Tic Tac Toe and the interfaces used to accomplish this. The goal is to separate the game logic as much as possible from the display logic.
In this tutorial, we are going to think of the game board as being made up of nine separate tiles. Each tile will draw a different border depending on the location of the tile. A tile will also be drawn different based on what its state is set as.
Valid states are:
Representing the Game Board
In this tutorial, we are going to think of the game board as being made up of nine separate tiles. Each tile will draw a different border depending on the location of the tile. A tile will also be drawn different based on what its state is set as.
Valid states are:
- Empty
- X
- O
Friday, June 3, 2011
Properly Scaling Android Images
This article describes how you can get an image to properly scale in an Android Image View.
Designing apps on the Android platform can sometimes be a challenge. Sometimes when dealing with images, you create a source image that is too large to fit on every screen. Since your app will likely run on a multitude of different devices, you want to ensure that it looks as good as possible on several different sized screens.
The Background Property
An image can automatically be scaled by setting it as the background property for a view. Sometimes this is desirable. For example, if you have an image that you want to be used as a background for your entire app, that is well suited to being stretched and skewed.
 |
| A linear layout with the background property set as an image |
Tuesday, May 31, 2011
Follow the Blog
Well, I haven't been having the best couple of weeks recently. If you like the tutorials and want to help cheer me up, follow the blog! Or leave some comments if you like.
Thursday, May 26, 2011
Android 9 Patch Image Tutorial
This tutorial describes what Android 9 patch images are, how to make them, and how to use 9 Patch images in Android applications.
A 9 patch image is an image that has stretchable areas defined.
These areas are defined in a special 1 pixel wide border around the area. Add black pixels to the top and left of this border to describe where the image can be stretched horizontally and vertically.
Nine patch images are especially useful when designing buttons. Custom drawn buttons can look distorted and pixelated when their borders are stretched in addition to the rest of the image.
Take a look at the Custom Drawn Button tutorial to see how using 9 Patch images can be used to create a button, and what happens if they aren't used.
Making a 9 Patch image is a fairly easy process. Included as part of the Android SDK is a Draw 9 Patch utility. Navigate to the folder where you installed the SDK. From there navigate to the tools folder. Inside this folder will be the draw 9 patch program. On Windows, double click on draw9patch.bat
What is a 9 Patch Image?
A 9 patch image is an image that has stretchable areas defined.
These areas are defined in a special 1 pixel wide border around the area. Add black pixels to the top and left of this border to describe where the image can be stretched horizontally and vertically.
Why Use 9 Patch Images?
Nine patch images are especially useful when designing buttons. Custom drawn buttons can look distorted and pixelated when their borders are stretched in addition to the rest of the image.
Take a look at the Custom Drawn Button tutorial to see how using 9 Patch images can be used to create a button, and what happens if they aren't used.
Creating 9 Patch Images
Making a 9 Patch image is a fairly easy process. Included as part of the Android SDK is a Draw 9 Patch utility. Navigate to the folder where you installed the SDK. From there navigate to the tools folder. Inside this folder will be the draw 9 patch program. On Windows, double click on draw9patch.bat
 |
| The draw9patch.bat file |
Wednesday, May 25, 2011
Creating a Custom Drawn Button for Android
Through this tutorial you will learn how to create a custom drawn button, and learn how to use that button in an application.
Why Create a Custom Drawn Button?
If you ask me, I feel like the default button drawing for Android makes the entire OS feel a bit like Windows 95. The button doesn't really look that different--it is basically the same plain boring gray.
Having a boring gray button can be an advantage. It instantly sticks out to most users and can be easily identified as an element that you can click. The other advantage is that it is the default button style and very easy to use and maintain.
There are also many advantages to using custom drawn buttons. You can use colors that better fit with the palette of your app, make buttons more distinguishable from each other, and give your app a more unique feel that helps separate it from the rest of the crowd.
Why Create a Custom Drawn Button?
If you ask me, I feel like the default button drawing for Android makes the entire OS feel a bit like Windows 95. The button doesn't really look that different--it is basically the same plain boring gray.
Having a boring gray button can be an advantage. It instantly sticks out to most users and can be easily identified as an element that you can click. The other advantage is that it is the default button style and very easy to use and maintain.
 |
| Two buttons with the default drawing style |
There are also many advantages to using custom drawn buttons. You can use colors that better fit with the palette of your app, make buttons more distinguishable from each other, and give your app a more unique feel that helps separate it from the rest of the crowd.
Wednesday, May 4, 2011
Introducing the Tic Tac Toe Tutorial
This blog post introduces the Tic Tac Toe tutorial and provides links to the other parts of the tutorial, as the tutorial itself is fairly long.
I can think of a number of good reasons. Maybe building Tic Tac Toe isn't your ambitious Android app goal, but by following this tutorial you will be introduced to a number of concepts that you can reuse and apply. And hopefully playing it can be a little fun.
Also, Tic Tac Toe is a great game to build because its a medium sized project. Not too lengthy and complex but not exactly trivial either. For this reason, the Tic Tac Toe tutorial will be broken down into a couple of blog posts.
Other Posts in the series
Android Tic Tac Toe Game Logic - Part 1 Interfaces
 |
| Screenshot of the finished Tic Tac Toe product |
Why Build Tic Tac Toe?
I can think of a number of good reasons. Maybe building Tic Tac Toe isn't your ambitious Android app goal, but by following this tutorial you will be introduced to a number of concepts that you can reuse and apply. And hopefully playing it can be a little fun.
Also, Tic Tac Toe is a great game to build because its a medium sized project. Not too lengthy and complex but not exactly trivial either. For this reason, the Tic Tac Toe tutorial will be broken down into a couple of blog posts.
Defining the Game
Before we actually get to the programming of the Tic Tac Toe game, lets set up some ground rules.- The game logic must be completely separate from the Android specific display logic
- The player will only play against the computer
- The player will always be X, the computer O
- There app will be limited to one activity, with one XML layout
- There will be two levels of difficulty
The Final Product
As you read this, the final product is already available for downloading and testing on your Android Device. Check it out on the Android market with the following link: https://market.android.com/details?id=com.dreamdom.tictactoeOther Posts in the series
Android Tic Tac Toe Game Logic - Part 1 Interfaces
Sunday, May 1, 2011
Creating an Android Calculator Tutorial
Through this tutorial you will learn how to develop and code a simple calculator in Android. Topics covered will include using a webview, layouts, and button listeners.
One of the cool things about having a smart phone is knowing that you will always have a calculator handy. If you need to total receipts, perform some supermarket comparisons, or calculate tips or percentages on the fly a calculator is definitely a handy tool.
However, the basic calculator app that comes preloaded with the Android Operating system leaves a lot to be desired. Perhaps you want to build your own more advanced calculator. You can use this tutorial as a starting point.
Introduction
One of the cool things about having a smart phone is knowing that you will always have a calculator handy. If you need to total receipts, perform some supermarket comparisons, or calculate tips or percentages on the fly a calculator is definitely a handy tool.
 |
| Screenshot of the calculator tutorial |
Friday, April 22, 2011
Get More Downloads for your Android Apps
 |
| More Apps button |
One of the most frustrating things about the Android Market is making sure that your app is visible. That is making sure that people can find it and download it.
If you have multiple apps in the Android market, you can use your apps to advertise for your other apps. Doing so is extremely simple.
You can use the following code snippet to open up the Android market to a page that displays all of your available apps.
Intent viewIntent = new Intent("android.intent.action.VIEW", Uri.parse("market://search?q=pub:\"PUBLISHING NAME\""));
startActivity(viewIntent);
Make sure to replace "PUBLISHING NAME" with the name that you publish your apps under, otherwise the search will come up blank.
Although this feature is already built in to the Android Market with the "More Apps by this Publisher" button, adding the link in your App can be helpful. After a user downloads your application, they may never return the App Page in the Android market.
After using your app or game, the user may decide that they like it enough that they want to check out your other products. Adding a button to link them to the Android Market makes this easier for them.
Friday, April 8, 2011
Android Millionaires
 |
| Cha-ching! |
How can you make a million dollars building and selling Android Apps? Just follow the examples of some people and companies that have already done so.
The article, Meet the Android App Millionaires at electricpig.co.uk breaks down eight successful groups and provides extra insight as to how you can learn from them.
The link to the Advanced Task Manager earnings wasn't working anymore, but androidandme sums up the basic information from it in their blog post Advanced Task Manager developer is making up to $10,000 a month. That story is particularly interesting because it seems like it is mostly the work of one individual.
Will you be on the list anytime soon?
Wednesday, April 6, 2011
Win $5000 making an Android App
This is pretty cool. Androidhomecoming.com is getting together with face.com to run a $5000 Android App challenge.
The challenge is going to be divided up into three rounds. The first round being just a short pitch of your app--250 words or less. From this, judges will narrow the field down to 30 entries.
So, start brainstorming some ideas for cool apps that somehow involve facial recognition. Doesn't matter if you can't quite program it yet--just come up with some great ideas.
I think that I will plan on entering the competition, but I will probably post some tutorials here regardless if I make it pass round one or not. Good look to everyone who enters!
Check out some example apps from face.com and head on over to androidhomecoming.com for all the details about how to enter.
For some inspiration, here is a video showing you how Nintendo has been using facial recognition in some games.
Sunday, March 27, 2011
Displaying a Static Web Page Inside of an Android Activity
In this tutorial, learn how to use the Android WebView to display a web page that is embedded into your app, without connecting to the internet. Learn how to properly include graphics as well.
Displaying a Static Web Page Inside of an Android Activity
Why Display Static Pages?
In a previous tutorial, we showed you how to display a web page from within an Android Activity.
This is very useful, but there may be some cases in which you want to take advantage of the html rendering capabilities without having to download a file from the internet.
Why would you want to do this?
- Your application won't have to require an internet permission
- Your requested web page will load faster
- You can use it to display important content (instructions, help files, high scores...) without relying upon an internet connection that could be spotty or non-existent
Wednesday, March 16, 2011
Android Market Adds Statistics
The Android Market now offers statistics to developers.
The Android Market has slowly but surely been improving, and is finally starting to feel like a real product. Don't get me wrong, the Android OS itself I have always been impressed with, but the market has always been lagging a little bit behind.
I always felt like google deserved to give it a little more love, since Apps are a huge selling point for the devices themselves. Having developed Android apps for a while now, there were many features I always wished the market would include, and I have finally begun to see a lot of them.
What other features do you think the Android Market needs to add or improve upon?
 |
| Android Install Statistics |
The Android Market has slowly but surely been improving, and is finally starting to feel like a real product. Don't get me wrong, the Android OS itself I have always been impressed with, but the market has always been lagging a little bit behind.
I always felt like google deserved to give it a little more love, since Apps are a huge selling point for the devices themselves. Having developed Android apps for a while now, there were many features I always wished the market would include, and I have finally begun to see a lot of them.
What other features do you think the Android Market needs to add or improve upon?
Sunday, March 13, 2011
Displaying a Web Page from Within an Android Activity
Android WebViews let you display fully formatted HTML inside of an Android Activity.This tutorial will walk you through adding and using a webview.
If you have followed through a couple of the tutorials already, or have already made a couple of applications on your own, then you have no doubt used several of the built in View types available from Android. One view you may not have known about is the Android WebView.
Android WebViews
If you have followed through a couple of the tutorials already, or have already made a couple of applications on your own, then you have no doubt used several of the built in View types available from Android. One view you may not have known about is the Android WebView.
 |
| AndroidDom loaded in a webview |
Wednesday, March 2, 2011
What's on my Android: Swype
Before I got my current phone I was looking for a slidekeyboard phone, unfortunately my provider didn't have any Android phones with that feature at the time. So I got my next option: a Samsung Captivate (from the Galaxy S series). My phone came with Swype and it has truly changed how I write my messages.

For those of you who don't know about it, Swype is an input method for touchscreens developed by Swype Inc. The application allows you to enter a word by sliding your finger from letter to letter and lifting to add a blank space and start a new word and includes an algorithm that autocompletes the word. It also includes dynamic learning, which means it learns which words you type the most and puts them at the top of the list. One of the best things is that because of its AI you don't have to be that accurate while sliding between letters.
Here is a LINK to a video I found on YouTube. Thanks to mobileburn for uploading the video.
Swype doesn't come with all the phones, but there is a beta version that you can register for and download in your Android phone. Simply go to http://beta.swype.com/.
But of course, there are other options for Swype [Disclaimer: I have not tested any of this it personally].
I have also hear great things about SwiftKey [On sale for $1.99 at the Android Market] which is an AI program that predicts the next word based on what you have already written, just like Swype it has a dynamic learning mechanism which makes it better every time you use it.
There are many other apps that try to do word autocompletion and prediction, and there are also other apps that attempt to make typing easier for example bigger keys. Two of the most interesting ones out there are:
If you have any questions, or any comments about this article feel free to chime in the comment section. We'll be back soon with more tutorials.

For those of you who don't know about it, Swype is an input method for touchscreens developed by Swype Inc. The application allows you to enter a word by sliding your finger from letter to letter and lifting to add a blank space and start a new word and includes an algorithm that autocompletes the word. It also includes dynamic learning, which means it learns which words you type the most and puts them at the top of the list. One of the best things is that because of its AI you don't have to be that accurate while sliding between letters.
Here is a LINK to a video I found on YouTube. Thanks to mobileburn for uploading the video.
Swype doesn't come with all the phones, but there is a beta version that you can register for and download in your Android phone. Simply go to http://beta.swype.com/.
But of course, there are other options for Swype [Disclaimer: I have not tested any of this it personally].
- SlideIt Keyboard by Dasur Ltd. $6.18 dlls in the Android Market.
- UltraKeyboard by Binary Bulge. $2.79 dlls in the Android Market. [This one has many options and sliding is one of them]
I have also hear great things about SwiftKey [On sale for $1.99 at the Android Market] which is an AI program that predicts the next word based on what you have already written, just like Swype it has a dynamic learning mechanism which makes it better every time you use it.
There are many other apps that try to do word autocompletion and prediction, and there are also other apps that attempt to make typing easier for example bigger keys. Two of the most interesting ones out there are:
- KeyPurr by KeyPurr technologies. $4.07 dlls in the Android Market. This keyboard reduces the keys to 17 bigger keys and also does text prediction and autocorrection (that is how it gets away with reducing the number of keys).
- 8pen by Michael@3QUBITS. Free in the Android Market. This app deserves a mention in this article because it is really different to all the other apps. It lays down the keyboard in a circle divided in 4 sections and by rolling your finger around it you can choose letters, I have not tried and I also read that it has quite a steep learning curve but supposedly it is worth it.
If you have any questions, or any comments about this article feel free to chime in the comment section. We'll be back soon with more tutorials.
Saturday, February 26, 2011
Android Art
While perusing the internet I came across this image and I thought I would share with you.

If you follow this link: [http://www.flickr.com/photos/47090009@N06/] you can see the rest of the series, it is pretty cool in my opinion. And here is the blog of the artist: [http://rougecrown.wordpress.com/]

If you follow this link: [http://www.flickr.com/photos/47090009@N06/] you can see the rest of the series, it is pretty cool in my opinion. And here is the blog of the artist: [http://rougecrown.wordpress.com/]
Wednesday, February 23, 2011
Quick Tip: Simple Debugging Android Apps with Logcat
Simple Debugging
The Android Debug Bridge (adb) is included as part of the Android SDK. One of the most powerful tools it features is the ability to view log messages from the Android Operating System and various android applications.
As part of setting up the Android sdk, you should already have ADB in your path variable. To use logcat, simply open up a terminal window, and type the following
adb logcat
You are now presented with continuously updating output of the most recently logged data. Pressing Ctrl+C will exit the logcat application.
If an application is crashing, force closing, often times you can use the logcat information to find out what went wrong.
If you want to log custom information for your app, just use the following code.
Log.w(String tag, String message)
and be sure to include the following import at the top of your file:
import android.util.Log;
Sometimes it is easy for a message to get lost in the log. If you really want to make a message stand out, you can surround it by several newlines. The following code shows this technique
Log.w("MyAPP", "\n\n Important message \n\n");
The Android Debug Bridge (adb) is included as part of the Android SDK. One of the most powerful tools it features is the ability to view log messages from the Android Operating System and various android applications.
As part of setting up the Android sdk, you should already have ADB in your path variable. To use logcat, simply open up a terminal window, and type the following
adb logcat
You are now presented with continuously updating output of the most recently logged data. Pressing Ctrl+C will exit the logcat application.
 |
| Screenshot of adb logcat running in Windows |
If an application is crashing, force closing, often times you can use the logcat information to find out what went wrong.
If you want to log custom information for your app, just use the following code.
Log.w(String tag, String message)
and be sure to include the following import at the top of your file:
import android.util.Log;
One Final Tip
Sometimes it is easy for a message to get lost in the log. If you really want to make a message stand out, you can surround it by several newlines. The following code shows this technique
Log.w("MyAPP", "\n\n Important message \n\n");
Monday, February 14, 2011
Valentine's Day
Happy Valentine's Day to all the Android Drom readers out there. We know that many people believe this is just a hallmark holiday, and in some ways it is. So we don't get all mushy buying flowers and chocolates, but we do cherish the friendships we have made and those people who are there for us no matter what.
But I'm sure most of you are here for the tutorials, and we are glad to inform you that we are working on new ones and you should be seeing them soon. Again, if you have any suggestions as to what you would like to see next simply let us know and we'll work on that.
Have a great week,
The Android Dom Team
Monday, February 7, 2011
Android Shopping Cart Tutorial
In this tutorial you will learn how to create a simple app that features several products which can be placed in a shopping cart. You can then view the contents of the shopping cart and remove items that you no longer want.
Update - after following this tutorial, be sure to check out part 2 and also check out part 3.
Creating a Shopping Cart for Android
A common problem that arises when developing Android applications is figuring out how to pass information from Activity to Activity within the Android application. This problem can be solved in two ways. For passing small amounts of information, you can put extras in the Intent that gets passed along to create the activity. For managing a larger, more complex amount of information the use of static variables is recommended.
Through this tutorial we will create a simple shopping cart. At the end of the tutorial, there are several suggestions for improving the shopping cart. Some of these suggestions may be included in a future tutorial.
 | |
| Screenshot of the finished Shopping Cart |
Thursday, January 27, 2011
Formatting Android Layout XML in Eclipse
Sometimes when you are editing Android Layouts in Eclipse, it makes more sense or is more convenient to change the actual xml content. The problem is, a lot of the time the xml is not pretty to look at. Lines of text often run off the screen and it is difficult to tell where one element begins and another ends.
But fear not!
Eclipse has some handy auto-formatting tools. Press Ctrl+Shift+F to auto-format the selected file. Or from the menu, click Source->Format.
Now your file will be cleaned up and easier to edit.
If you have text selected, only the selected text will be formatted. If no Text is selected, the entire file will be formatted. And Auto-Format will work on your Java files too.
 |
| Messy Android Layout XML |
Eclipse has some handy auto-formatting tools. Press Ctrl+Shift+F to auto-format the selected file. Or from the menu, click Source->Format.
 |
| Formatting Menu Option |
Now your file will be cleaned up and easier to edit.
 |
| Formatted Android Layout XML |
If you have text selected, only the selected text will be formatted. If no Text is selected, the entire file will be formatted. And Auto-Format will work on your Java files too.
Tuesday, January 25, 2011
Android Button Tutorial
In this tutorial we will create a simple Android App that responds to input from a button. Every time the button is clicked, an onscreen counter will update showing the total number of clicks.
Most Android apps involve using buttons to direct actions within the activity. Think about the built in calculator application. It is essentially made up of just a bunch of buttons. They may not look like the standard, buttons, but it is possible to skin Android buttons to look however you want.
Android Button Example
Start a new android project. Call the project "Button Tutorial" and set the package name to "example." Check the "Create Activity" checkbox in the wizard and set the activity name to "MainActivity" If you need help see this tutorial for more information on creating a "Hello World" project.
For a full tutorial on create layouts, click here for the android layout tutorial.
Open up the layout file main.xml. Make sure the following properties are set for the parent linear layout.
Layout height: fill_parent
Layout width: fill_parent
Orientation: vertical
If there isn't a TextView in the layout already, add one. Set the following properties.
Id: @+id/TextViewCount
Text: "Count"
Text Size: 40dip
Layout height: wrap_content
Layout width: fill_parent
Layout margin bottom: 10dip
Now, add a Button to the layout, and set the following properties.
Id: @+id/ButtonCount
Text: Count
Min width: 125dip
Layout height: wrap_content
Layout width: wrap_content
Layout gravity: center
Feel free to adjust the properties as you see fit. Listed below is a screenshot of the layout we have created.
Make sure to save your layout after you have modified it. When you save the layout, the generated Java class, R, will be recreated to include the ids of any new elements you have added to the layout.
Now that we have created the layout, its time to edit the actual Java code that is the logic behind the program. Open up MainActivity. It is located under src->example->MainActivity.java in the project explorer.
Let's examine the code that is already there.
MainActivity extends the Activity class. Activities are the main components of Android Applications. The onCreate method gets called when the parts of the activity need to get built. The first line calls the super constructor, and the second line sets the layout of the activity.
Now add a member variable that will keep track of the count. The complete code for the activity so far is listed below.
The Android Developer Tools make it really easy to reference the components inside of your resources folder. The ADT will automatically generate a Java file, R, that contains unique integer ids for all your resources. These generated IDs can then be used in your Java code to reference the resources.
R.java is located inside "gen" folder for generated java files. You should never be editing generated files because you will likely
Now we want to obtain references to the views we created in the layout. We need these references in the Java file so that we can program the logic behind how they operate. Add the following code just below the setContentView... line
You will need to add the following lines at the top of your project.
If you are still getting errors as part of "R.id...." make sure that you have saved the layout after modifying it.
Now that we have references to these views we can modify them in all sorts of ways through the Java code. Most of the properties we've set in the layout editor can also be set by using member functions for the views.
Now that we have a reference to the count button, we want to add a listener that handles when the count button is clicked. An easy way to do this is to have an anonymous class implement the View.OnClick interface. The Code listed below demonstrates this.
Make sure to add the following code to the top of the file.
Now we just need to fill in the logic that will increment the count, and update the value of the text view. Add the following code inside of the onClickListener that you just created.
Finally, run your project and press the count button. You should see the count on the screen go up.
Full code for MainActivity.java
Full code for main.xml
As always, please leave any questions you have in the comments area, and I will be glad to help!

Most Android apps involve using buttons to direct actions within the activity. Think about the built in calculator application. It is essentially made up of just a bunch of buttons. They may not look like the standard, buttons, but it is possible to skin Android buttons to look however you want.
 |
| Screenshot of the Android calculator. |
Step 1. Create a new Android project
Start a new android project. Call the project "Button Tutorial" and set the package name to "example." Check the "Create Activity" checkbox in the wizard and set the activity name to "MainActivity" If you need help see this tutorial for more information on creating a "Hello World" project.
Step 2. Create a layout that includes a button
For a full tutorial on create layouts, click here for the android layout tutorial.
Open up the layout file main.xml. Make sure the following properties are set for the parent linear layout.
Layout height: fill_parent
Layout width: fill_parent
Orientation: vertical
If there isn't a TextView in the layout already, add one. Set the following properties.
Id: @+id/TextViewCount
Text: "Count"
Text Size: 40dip
Layout height: wrap_content
Layout width: fill_parent
Layout margin bottom: 10dip
Now, add a Button to the layout, and set the following properties.
Id: @+id/ButtonCount
Text: Count
Min width: 125dip
Layout height: wrap_content
Layout width: wrap_content
Layout gravity: center
Feel free to adjust the properties as you see fit. Listed below is a screenshot of the layout we have created.
 |
| Screenshot of the layout created. |
Make sure to save your layout after you have modified it. When you save the layout, the generated Java class, R, will be recreated to include the ids of any new elements you have added to the layout.
Step 3. Add a OnClick listener to the button
Now that we have created the layout, its time to edit the actual Java code that is the logic behind the program. Open up MainActivity. It is located under src->example->MainActivity.java in the project explorer.
 |
| Screenshot of the MainActivity generated code |
Let's examine the code that is already there.
MainActivity extends the Activity class. Activities are the main components of Android Applications. The onCreate method gets called when the parts of the activity need to get built. The first line calls the super constructor, and the second line sets the layout of the activity.
Now add a member variable that will keep track of the count. The complete code for the activity so far is listed below.
package com.dreamdom.tutorials.buttontutorial;

import android.app.Activity;
import android.os.Bundle;

public class MainActivity extends Activity {

    // Private member field to keep track of the count
    private int mCount = 0;

    /** Called when the activity is first created. */
    @Override
    public void onCreate(Bundle savedInstanceState) {
        super.onCreate(savedInstanceState);
        setContentView(R.layout.main);
    }
}
About Android Resources
The Android Developer Tools make it really easy to reference the components inside of your resources folder. The ADT will automatically generate a Java file, R, that contains unique integer ids for all your resources. These generated IDs can then be used in your Java code to reference the resources.
Do not modify the file R.java!
R.java is located inside "gen" folder for generated java files. You should never be editing generated files because you will likely
- Cause a problem
- Have your changes overwritten almost immediately
- Give yourself lots of headaches
Step 4. Obtaining references to the views
Now we want to obtain references to the views we created in the layout. We need these references in the Java file so that we can program the logic behind how they operate. Add the following code just below the setContentView... line
final TextView countTextView = (TextView) findViewById(R.id.TextViewCount);
final Button countButton = (Button) findViewById(R.id.ButtonCount);
You will need to add the following lines at the top of your project.
import android.widget.TextView;
import android.widget.Button;
If you are still getting errors as part of "R.id...." make sure that you have saved the layout after modifying it.
Now that we have references to these views we can modify them in all sorts of ways through the Java code. Most of the properties we've set in the layout editor can also be set by using member functions for the views.
Step 5. Add a onClickListener to the Count Button
Now that we have a reference to the count button, we want to add a listener that handles when the count button is clicked. An easy way to do this is to have an anonymous class implement the View.OnClick interface. The Code listed below demonstrates this.
countButton.setOnClickListener(new OnClickListener() {

    public void onClick(View v) {

    }
});
Make sure to add the following code to the top of the file.
import android.view.View;
import android.view.OnClickListener
Step 6. Fill in the counting logic
Now we just need to fill in the logic that will increment the count, and update the value of the text view. Add the following code inside of the onClickListener that you just created.
mCount++;
countTextView.setText("Count: " + mCount);
Step 7: The finished product
Finally, run your project and press the count button. You should see the count on the screen go up.
 |
| Screenshot of the finished app |
Full code for MainActivity.java
package com.dreamdom.tutorials.buttontutorial;

import android.app.Activity;
import android.os.Bundle;
import android.view.View;
import android.view.View.OnClickListener;
import android.widget.Button;
import android.widget.TextView;

public class MainActivity extends Activity {

    // Private member field to keep track of the count
    private int mCount = 0;

    /** Called when the activity is first created. */
    @Override
    public void onCreate(Bundle savedInstanceState) {
        super.onCreate(savedInstanceState);
        setContentView(R.layout.main);

        final TextView countTextView = (TextView) findViewById(R.id.TextViewCount);
        final Button countButton = (Button) findViewById(R.id.ButtonCount);

        countButton.setOnClickListener(new OnClickListener() {

            public void onClick(View v) {
                mCount++;
                countTextView.setText("Count: " + mCount);
            }
        });

    }
}
Full code for main.xml
<?xml version="1.0" encoding="utf-8"?>
<LinearLayout xmlns:android="http://schemas.android.com/apk/res/android"
    android:orientation="vertical" android:layout_width="fill_parent"
    android:layout_height="fill_parent">
    <TextView android:layout_width="fill_parent"
        android:layout_height="wrap_content" android:text="Count" android:id="@+id/TextViewCount"
        android:textSize="40dip" android:layout_marginBottom="10dip" />

    <Button android:layout_width="wrap_content"
        android:layout_height="wrap_content" android:layout_gravity="center"
        android:text="Count" android:id="@+id/ButtonCount" android:minWidth="125dip"></Button>
</LinearLayout>
As always, please leave any questions you have in the comments area, and I will be glad to help!
------------------------------------------------------------
We create these tutorials in our free time. If you like what you see please consider buying us a cup of coffee so we can keep creating useful material. Click on the image below to make a donation via Paypal.
Wednesday, January 19, 2011
Android Layout Tutorial
Android layouts can be very intimidating at the first look. Instead of a grid where you can drag components to precise absolute positions, you are greeted with xml code and a WYSIWYG (What you see is what you get) editor that doesn't seem to behave the way you want it to.
It's enough to drive you insane and, for some, enough to put you off on Android development entirely.
But don't despair! Follow these tips and you will be making layouts in a flash. You may even learn to love Android XML Layouts.
This tutorial assumes that you have the Eclipse IDE set up for Android development, and know how to make a "hello world" application. For more detailed instructions on how to do that, visit this link http://developer.android.com/guide/developing/eclipse-adt.html
Dom's Steps:
1. Prototype on Paper
This is a crucial step. It can help to organize your thoughts and lead to less headaches and frustrations when you actually start to design for real. One strategy is to used a notecard for the layout sketch. Notecards provide a rough approximation of the size of an Android smartphone.
If you want to be more organized, I recommend using a notebook or a sketchbook so you can keep multiple layouts for a single app together.
For this tutorial we are going to pretend that we are creating a layout for part of a simple twitter application. The completed sketch is shown below.
2. Start thinking in terms of Linear Layouts and Views
Now that you have a sketch of what you want your layout to look like, start picturing the pieces of the drawing as views.
An Android layout is made up of views. Views are components like Buttons, Images, and Text Inputs. These views can organized in a number of sub layouts.
I recommend sticking using LinearLayouts to organize your views. LinearLayouts are simple, easy to modify, and can handle mostly anything. A lot of times it seems easy to think in terms of tables, but Table Layouts are not as flexible, and will usually end up causing problems and frustration as you try to modify them. TableLayouts force equal column width, and make it difficult to span columns.
3. Start a New Layout in Eclipse.
To start, create a simple "Hello World" type application. See this tutorial for more information. I chose to create an Android 1.5 project, but you can choose a different version if you like.
In the project explorer right click on the layout folder and select "New Android XML File" Type in layout.xml as the name, and make sure the type of resource selected is layout.
The WYSIWYG in Eclipse can be difficult at times but it makes designing layouts easier by giving you the outline view on the right, and the property list editor at the bottom. Click the element named LinearLayout in the outline view.
Now you can easily change the properties associated with the outline view from the properties view. The properties view is generally located at the bottom of the screen, next to the console output. If you can't see it go to Window->Show View->Other...->General->Properties.

Make sure the following properties are set for the outline view.
Misc->Layout Height: Fill Parent
Misc->Layout Width: Fill Parent
Orientation: Vertical
Now set the background property to #ffffff. The background should turn white. You can enter any valid hexadecimal color code to set the background.
4. Add the Views for the First Row
Now that we have the base layout set, we want to add another LinearLayout to hold the views for the first row. Click the plus button on the outline view to add another LinearLayout.
Note: At the time of the publishing of this article the current version of the Android Developer Tools does not include the plus, up arrow, and down arrow buttons. It is currently unclear whether this was intentional or a bug. You can still add components by dragging them from the list on the left, onto the preview display on the right.
Set the following properties.
Orientation: Horizontal
Misc->Layout Width: Fill Parent
ID's should be unique within an xml layout file, but they do not have to be unique among all the xml layout files. When you add an element, the sdk will automatically generate a valid ID for the element, but it can be helpful to change the id to a more recognizable name.
Now add the views to the first row. Click the plus button to add an ImageView. Click the plus button again to add a TextView. Use the up and down arrows to adjust the order of the views and make sure they have the proper parent element.
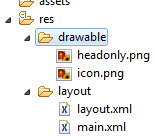
The outline view should now look like this.

Copy the following image to the drawable directory of project. Name it headonly.png
Depending on what target version (Android 1.5, 1.6, 2.0, etc...) of the Android OS you have selected, you will also notice that they place three different folders as the drawable directory: drawable-hdpi, drawable-ldpi, and drawable-mpdi. This stand for high, medium and low density-independent pixel. And were designed to further customize the applications depending on the type of phone (some support better graphics). To learn more please visit: http://developer.android.com/guide/practices/screens_support.html.
For now we'll be storing our images under the drawable-hpdi folder. Even though the picture is in a specific folder (hdpi) set the source to @drawable/headonly and Android will figure out where to look for the image.
Now set a few of the properties for the views you just added.
ImageView01->Padding: 7dip
ImageView01->Src: @drawable/headonly
TextView01->Text color: #000000
TextView01->Text size: 30dip
TextView01->Text: Twitter Name
TextView01->Misc->Layout gravity: Center
TextView01->Misc->Layout margin left: 10dip
The layout should look like this now.
If you are having problems placing the components make sure the parent layers have the right settings. One possible problem is having the parent layer set up to get the height of the parent instead of wrapping, which made the text appear in the middle of the screen.
What is DIP?
DIP stands for density independent pixels. Since different devices can have different dpi's, specifying measurements in DIP instead of pixels can help ensure a more consistent look and feel among different devices.
5. Adding the ListView
ListViews are one of the most versatile Android components. They let you combine may different items that have a similar layout into a object that has built in scroll and flick capabilities.
We will add the ListView to the layout in this tutorial. Populating the ListView with actual data is handled programmatically and beyond the scope of this tutorial.
Select LinearLayout from the outline window and then drag and drop the ListView. Now LinearLayout is the parent of ListView. If the arrows on the outline view are visible (see earlier note) you can use them to adjust the hierarchy of the views so that the parent of the ListView01 is LinearLayout.
Set the following property.
ListView01->Misc->Layout Weight: 1
Setting the layout weight as a value of 1 tells the list view to take up all the remaining available space.
6. Adding the Bottom Row
Select the top LinearLayout and drag and drop another linear layout. By default it will go to the end of the list. Set the following properties.
Orientation: Horizontal
Misc->Layout Width: Fill Parent
ID: @+id/ButtonLayout
This linear layout should be underneath the ListView in the Orientation View, and have this new LinearLayout as its parent. Feel free to rename this LinearLayout as
Add three buttons to ButtonLayout. Set the following property for all the buttons.
Layout weight: 1
Layout width: 100dip
Set the text for the three buttons to be Share, Search, and Retweet. By setting the weights and the widths the same, the three buttons should equally share the width of the available screen.
A note about adding the buttons with Drag and Drop
6. The Finished Layout
The finished layout should look like this.
The complete xml for the layout is pasted below. When you are using Eclipse to view the xml, pressing Ctrl+Shift+f will auto format the xml. to make it look nicer.
The full xml of the layout:
It's enough to drive you insane and, for some, enough to put you off on Android development entirely.
But don't despair! Follow these tips and you will be making layouts in a flash. You may even learn to love Android XML Layouts.
This tutorial assumes that you have the Eclipse IDE set up for Android development, and know how to make a "hello world" application. For more detailed instructions on how to do that, visit this link http://developer.android.com/guide/developing/eclipse-adt.html
Dom's Steps:
1. Prototype on Paper
This is a crucial step. It can help to organize your thoughts and lead to less headaches and frustrations when you actually start to design for real. One strategy is to used a notecard for the layout sketch. Notecards provide a rough approximation of the size of an Android smartphone.
 |
| A notecard next to an Android phone |
If you want to be more organized, I recommend using a notebook or a sketchbook so you can keep multiple layouts for a single app together.
For this tutorial we are going to pretend that we are creating a layout for part of a simple twitter application. The completed sketch is shown below.
 |
| A sketch of the layout |
2. Start thinking in terms of Linear Layouts and Views
Now that you have a sketch of what you want your layout to look like, start picturing the pieces of the drawing as views.
An Android layout is made up of views. Views are components like Buttons, Images, and Text Inputs. These views can organized in a number of sub layouts.
I recommend sticking using LinearLayouts to organize your views. LinearLayouts are simple, easy to modify, and can handle mostly anything. A lot of times it seems easy to think in terms of tables, but Table Layouts are not as flexible, and will usually end up causing problems and frustration as you try to modify them. TableLayouts force equal column width, and make it difficult to span columns.
3. Start a New Layout in Eclipse.
To start, create a simple "Hello World" type application. See this tutorial for more information. I chose to create an Android 1.5 project, but you can choose a different version if you like.
In the project explorer right click on the layout folder and select "New Android XML File" Type in layout.xml as the name, and make sure the type of resource selected is layout.
 |
| The layout folder in the project explorer |
The WYSIWYG in Eclipse can be difficult at times but it makes designing layouts easier by giving you the outline view on the right, and the property list editor at the bottom. Click the element named LinearLayout in the outline view.
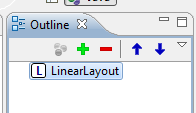 | |
| The outline view |
Now you can easily change the properties associated with the outline view from the properties view. The properties view is generally located at the bottom of the screen, next to the console output. If you can't see it go to Window->Show View->Other...->General->Properties.
Make sure the following properties are set for the outline view.
Misc->Layout Height: Fill Parent
Misc->Layout Width: Fill Parent
Orientation: Vertical
Now set the background property to #ffffff. The background should turn white. You can enter any valid hexadecimal color code to set the background.
4. Add the Views for the First Row
Now that we have the base layout set, we want to add another LinearLayout to hold the views for the first row. Click the plus button on the outline view to add another LinearLayout.
Note: At the time of the publishing of this article the current version of the Android Developer Tools does not include the plus, up arrow, and down arrow buttons. It is currently unclear whether this was intentional or a bug. You can still add components by dragging them from the list on the left, onto the preview display on the right.
 |
| Screenshot showing the list of views to add on the left, and the display preview in the middle |
Set the following properties.
Orientation: Horizontal
Misc->Layout Width: Fill Parent
ID's should be unique within an xml layout file, but they do not have to be unique among all the xml layout files. When you add an element, the sdk will automatically generate a valid ID for the element, but it can be helpful to change the id to a more recognizable name.
Now add the views to the first row. Click the plus button to add an ImageView. Click the plus button again to add a TextView. Use the up and down arrows to adjust the order of the views and make sure they have the proper parent element.
The outline view should now look like this.
Copy the following image to the drawable directory of project. Name it headonly.png
 |
| headonly.png |
Depending on what target version (Android 1.5, 1.6, 2.0, etc...) of the Android OS you have selected, you will also notice that they place three different folders as the drawable directory: drawable-hdpi, drawable-ldpi, and drawable-mpdi. This stand for high, medium and low density-independent pixel. And were designed to further customize the applications depending on the type of phone (some support better graphics). To learn more please visit: http://developer.android.com/guide/practices/screens_support.html.
For now we'll be storing our images under the drawable-hpdi folder. Even though the picture is in a specific folder (hdpi) set the source to @drawable/headonly and Android will figure out where to look for the image.
Now set a few of the properties for the views you just added.
ImageView01->Padding: 7dip
ImageView01->Src: @drawable/headonly
TextView01->Text color: #000000
TextView01->Text size: 30dip
TextView01->Text: Twitter Name
TextView01->Misc->Layout gravity: Center
TextView01->Misc->Layout margin left: 10dip
The layout should look like this now.
 |
| The current progress of the layout |
If you are having problems placing the components make sure the parent layers have the right settings. One possible problem is having the parent layer set up to get the height of the parent instead of wrapping, which made the text appear in the middle of the screen.
What is DIP?
DIP stands for density independent pixels. Since different devices can have different dpi's, specifying measurements in DIP instead of pixels can help ensure a more consistent look and feel among different devices.
5. Adding the ListView
ListViews are one of the most versatile Android components. They let you combine may different items that have a similar layout into a object that has built in scroll and flick capabilities.
We will add the ListView to the layout in this tutorial. Populating the ListView with actual data is handled programmatically and beyond the scope of this tutorial.
Select LinearLayout from the outline window and then drag and drop the ListView. Now LinearLayout is the parent of ListView. If the arrows on the outline view are visible (see earlier note) you can use them to adjust the hierarchy of the views so that the parent of the ListView01 is LinearLayout.
Set the following property.
ListView01->Misc->Layout Weight: 1
Setting the layout weight as a value of 1 tells the list view to take up all the remaining available space.
6. Adding the Bottom Row
Select the top LinearLayout and drag and drop another linear layout. By default it will go to the end of the list. Set the following properties.
Orientation: Horizontal
Misc->Layout Width: Fill Parent
ID: @+id/ButtonLayout
 |
| Screenshot of where to change the id |
This linear layout should be underneath the ListView in the Orientation View, and have this new LinearLayout as its parent. Feel free to rename this LinearLayout as
Add three buttons to ButtonLayout. Set the following property for all the buttons.
Layout weight: 1
Layout width: 100dip
Set the text for the three buttons to be Share, Search, and Retweet. By setting the weights and the widths the same, the three buttons should equally share the width of the available screen.
A note about adding the buttons with Drag and Drop
After setting up the properties of the linear layout if you try to drag and drop the buttons it won't work, they won't be added as the child of the last linear layout. So here is Silvia's trick: for the ButtonLayout choose the layout height to be the same as the parent. Now if you select it and drag and drop the buttons, these will be added in the right hierarchy. It is important that as soon as you finished adding the buttons you return the button layout to wrap layout height.
6. The Finished Layout
The finished layout should look like this.
 |
| The finished layout |
The complete xml for the layout is pasted below. When you are using Eclipse to view the xml, pressing Ctrl+Shift+f will auto format the xml. to make it look nicer.
The full xml of the layout:
<?xml version="1.0" encoding="utf-8"?>
<LinearLayout xmlns:android="http://schemas.android.com/apk/res/android"
 android:orientation="vertical" android:layout_height="fill_parent"
 android:layout_width="fill_parent" android:background="#ffffff">
 <LinearLayout android:layout_width="wrap_content"
  android:layout_height="wrap_content" android:id="@+id/LinearLayoutFirstRow">
  <ImageView android:id="@+id/ImageView01"
   android:layout_width="wrap_content" android:layout_height="wrap_content"
   android:src="@drawable/headonly" android:padding="7dip"></ImageView>
  <TextView android:id="@+id/TextView01" android:layout_width="wrap_content"
   android:layout_height="wrap_content" android:textSize="30dip"
   android:textColor="#000000" android:text="Twitter Name"
   android:layout_gravity="center" android:layout_marginLeft="10dip"></TextView>


</LinearLayout>

<ListView android:id="@+id/ListView01" android:layout_width="wrap_content" android:layout_height="wrap_content" android:layout_weight="1">
</ListView>

<LinearLayout android:id="@+id/LinearLayout01" android:layout_height="wrap_content" android:layout_width="fill_parent" android:orientation="horizontal"><Button android:id="@+id/Button01" android:layout_height="wrap_content" android:layout_weight="1" android:text="Share" android:layout_width="100dip"></Button>
<Button android:id="@+id/Button02" android:layout_height="wrap_content" android:layout_weight="1" android:text="Search" android:layout_width="100dip"></Button>
<Button android:id="@+id/Button03" android:layout_height="wrap_content" android:layout_weight="1" android:text="Retweet" android:layout_width="100dip"></Button>


</LinearLayout>
</LinearLayout>
Monday, January 17, 2011
Two Categories of Tutorials

Beginner tutorials will be directed towards people who may have some programming experience, but are new to the Android platform. The goal of these tutorials is to provide a thorough introduction to many Android concepts and to provide examples that are practical applications. These tutorials will build off of each other.
Examples of some beginner tutorials I have planned:
- Creating a layout
- Making a button do something
- Creating a simple widget
- Building a full Tic-Tac-Toe game
- Displaying a popup dialog
Advanced tutorials will assume more knowledge of Android concepts, and can be read a-la cart. Many of them will be based off of situations that I encountered that gave me some trouble in building my apps.
Examples of some advanced tutorials I have planned:
- Scanning storage for media files
- Animating views
- Fading one image into another
Sunday, January 16, 2011
Creating the Hello World Project
By using some of the Wizards in the Android Developer Toolkit, the "Hello World" project can easily be created and turned into another app, by automatically creating an Activity, Layout, and updating the application manifest.
The official Android website has a great tutorial on getting the hello world project set up. You can find the tutorial here http://developer.android.com/resources/tutorials/hello-world.html
Friday, January 14, 2011
Welcome to Android Dom
Welcome to Android Dom!
Here I will be posting various tips, tricks, and perhaps a couple of complete tutorials on how to make android apps.
Please stop by often, as I plan to update this blog on a weekly basis.
Here I will be posting various tips, tricks, and perhaps a couple of complete tutorials on how to make android apps.
Please stop by often, as I plan to update this blog on a weekly basis.
Subscribe to:
Posts (Atom)